🍰HOW TO MAKE PERFECT WHIPPED CREAM DOLLOPS! 🍰
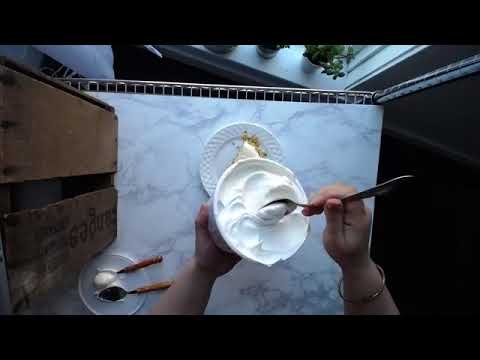
Hey everyone, Dani here! Today, we’re talking all about how to style whipped cream dollops for that flawless, picture-perfect look. Let’s dive in!
Step 1: Skip the Real Whipped Cream
While we all love the taste of real whipped cream, it just doesn’t hold up well on camera. Instead, Cool Whip or a similar whipped topping works best for styling since it holds its shape much longer.
Step 2: Create a Smooth Base
- Start by smoothing out the whipped topping in your bowl or on your dessert. The lid often leaves an imprint, so use a spatula to get a flat, even surface.
- This smooth base will make it easier to form clean, consistent swirls.
Step 3: Create Beautiful Ridges
- Use the back of a spoon to make ridges. Drag the spoon lightly over the surface in swooping motions to create waves and ridges.
- Experiment with spoon sizes. A smaller spoon will give you tighter swirls, while a larger spoon will create broader curves. Find what works best for your aesthetic.
Step 4: Perfect the Dollop
Once you have your ridges in place:
- Take a larger spoon and carefully lift a dollop, preserving all those pretty ridges.
- Place it gently on your dessert, adjusting as needed to make sure the dollop stays in place.
If you’re not happy with it, don’t worry! Just scrape it off and try again. Whipped topping is forgiving, so you can easily redo it.
Step 5: Add Finishing Touches
- If there are smudges or areas that need touch-ups, cover them with more whipped topping or clean up the edges with a bit of rubbing alcohol.
- Garnish options: For an extra pop, add a small mint sprig, dust with powdered sugar, cinnamon, or cocoa powder. These little details can make a big difference in your shot.
Step 6: Capture the Perfect Shot
- Remember, whipped topping won’t last forever on set, so add the dollop just before taking the photo.
- For added texture, lift and pull on the topping slightly to create points or peaks in the whipped cream. This gives it that soft, airy feel that looks great on camera.
I hope this helps! If you have any questions, feel free to leave a comment or join us in the Facebook group for more styling tips and tutorials. Happy styling, and see you tomorrow for Day 4!